{Five Days of Dough}


Around this time last year, I texted Karen an adorable toddler handprint painted to look like Santa: "We're totally doing this with the kids." I invited her over a couple of weeks before Christmas, we made a batch of salt dough, I forced my daughter's clenched fists open, and pressed her tiny fingers into the mush. 

Twelve months later, I'm standing in a sea of salt (toddler measuring and pouring is a messy task), and we're pressing little hands and feet into doughy goodness.  

What is it about dough? What makes it so magical for toddlers to explore? 

First of all, as it's name would suggest, the main point of play dough is "play". Most of the time when we hand Lucas and Chuck a ball of dough, we have nothing planned other than mushing around dough. All the motions-the smoothing, the rolling, the patting, the building- are a workout for little hands. This is an important part of developing fine motor skills. 

The textural experience of different kinds of dough also encourages sensory exploration. Chuck wasn't so sure she liked dough the first time she touched it. It took her a little while to get used to. Her little hands had to get used to the way it felt. Lucas dove right in, making foot prints with an emphatic "ta da!"
This is how we came up with LuCk's Five Days of Dough!  It's an integral part of our kid's sensory diet! 

{Day 1}

This smooth white dough is perfect for ornament making! You can roll it out and make hand prints, use cookie cutters to create shapes!  The best part about this dough is it's color.  Thanks to the 2 Cups of baking soda it is almost pure white!
1 1/2 Cups of Water
2 Cups Baking Soda
1 Cup Cornstarch
In a pot, combine all the ingredients and stir over a medium heat.  When the mixture starts to look like mashed potatoes, remove from the heat, and let it cool down. 
Bake in a 175 degree oven until hard to the touch 


{Day 2} 

This dough is a classic! You almost always have all the right ingredients in your house to make it!  It sturdy enough to last a couple of days (or weeks . . . ) in an airtight container. 
If you decide you want to preserve your child's creations, simply air dry, or bake in a 200 deg F oven until hard 
Recipe: 
In a bowl, mix the following ingredients
1 Cup Salt
1 Cup Flour
1/2 Cup Water
Stir until smooth

Day 3 
{Elf Dough} 
 (aka Peppermint Sparkle Play Dough)
This is the classic LuCk Dough mixed with some peppermint oil and glitter. 
We rolled it up in a ball, put it in a ziplock bag, and gave it to our friends at daycare!   

{Day 4}
Shapes and Sizes

Sometimes it doesn't really matter what kind of dough you use, its what you make out of it!  We like to "capture the moment" in dough with hand prints, foot prints, and any other kind of print you can think of. 
Chuck likes to build snowmen and makes her dollies cakes. Let their imaginations soar!  Dough can be anything! 

{Day 5} 
Tools Of The Trade

The kids are like Macgyver when it comes to finding things to mush into dough.  Cookie cutters, trucks, spatulas - go search around your house to find things to create interesting patterns in your dough! 

Watching the kids help us mix up the salt dough this year was a real treat!  It's a fun way to mark how far their little minds have come in these last 12 months. 


{Simple Gifts}


A couple of weeks ago I shared an article from one of my favorite blogs, on Heuristic Play. Basically, Heuristic Play is a fun way of saying "kids like to investigate the objects around them using their senses[" What amazed me was all the friends that shared their photos and comments about their babies playing with a whisk for hours.  

Since we celebrate the "Winter Trifecta" in my household (Chanukah, Christmas, Birthdays), I am frequently asked "What does Chuck want?"  First of all, Chuck has no idea what she wants.  She's two. Aside from that, she literally has fun playing with a paper bag.  This got me thinking . . . 

Since this is the season, these are some  Simple Gifts that have been Chuck approved! 

The Plastic Bottle 
This has been a long time favorite of Chuck's.  I noticed her affinity for an empty plastic bottle at a very young age.  In fact, I remember being rather humbled by the fact that she pretty much ignored all those clip on toys I bought for her car seat/stroller. All she wanted was a plastic bottle.  She wanted to nom on the top.  She wanted to squish it and make it change shapes.  She wanted to roll it on the floor. 

Now that she's a bit older, I notice that she enjoys filling the bottles with items found around the house and makes them into shakers.  Over the summer, we spent hours filling them with water and emptying them.  

Simply said: Chuck loves herself a plastic bottle

The teacher part of me loves watching how she can spend hours exploring the plastic bottle.  When she fills it with little things found around the house, she is working on her fine motor skills.  When she's rolling it around, she's working on her gross motor skills.  This is really a win/win toy for everyone! 

The Cardboard Box
One day, last winter, I cut a hole in a cardboard box[,] and made it into a tunnel for Chuck. That box survived many, many snow days last year.  For a while it was a tunnel.  When it was turned over, it was a boat.  Cardboard boxes are great for imaginative play -- because they let your child IMAGINE!  Cardboard boxes give her a blank canvas to construct whatever she wants. Watching Chuck build and construct the world around her is amazing! 

The Blankie 
Now, this one's not a freebie.  However, if you are anything like me, you were given a thousand blankets to welcome your little one into the world.  The first couple of months, you probably wrapped up your baby burrito style.  During the summer months, I would drape them over the stroller to protect Chuck from the sun.  

They are also great for fort building, peek-a-boo, hiding things . . . I can go on, and on, and on.  Building a blanket fort is one of our favorite go to activities.

While these suggestions may seem all too simple, we know them to be true. We have all seen our children, and everyone else's children, play with the box and ignore the fancy toy. Embrace your child's sense of imaginative play, and hand them everyday items that allow them to construct their own worlds. Of course, use your common sense and best judgement with regard to any item given to a child for play, and supervise when necessary. Take the caps off the bottles, make sure all the staples are out of the cardboard box. Most importantly, don't forget to jump in too, and have fun!

Also, for the record:  a lot of my house still looks like this:


{Project: Glitter Pinecones}


I have always had a creative side and have waited many years to decorate my house with homemade goodies made by tiny hands. 

 Let's face it, most kids crafts are cheesy, made with tissue paper or toilet paper rolls and although you love it because your kid made it, it's just not beautiful to look at. 

Problem: how am I going to make a simple, beautiful Christmas craft with my toddler? 

Solution: when in doubt, look to nature. Everything out there is unique and beautiful in its own right. Lucas is a big fan of exploring the great outdoors. He loves to listen to the birds, dig in the dirt and collect "treasures". One day, we were on the playground and Lucas began collecting pinecones! There are so many things to do with pinecones, but to make it toddler simple I decided to go with glue and glitter! Now this may sound like a disaster waiting to happen, but with a few of the right tools this project can be done with minimum mess. The trick is to keep everything contained. 

We contained the glue in an old frosting container and the glitter in tennis ball tubes. You can use anything as long as the top is as wide as your largest pinecone and it is recommended your glitter containers have tops. 

I was a little hesitant about doing this project with Lucas. Have you ever tried to use glitter with a toddler while taking pictures? I gave it a test run the night before, just to make sure everything was ready (and to snap a few pics incase it was glitter disaster the next day). As soon as Lucas was down the stairs the next morning he was interested what I had left on the counter. In all honesty, it went even better than I imagined! I had two containers of glitter ready to go to keep things moving along but much to my surprise Lucas loved dipping the pinecones in the glue and watching the glue drip off! He made 10 pinecones all by himself. He loved shaking the tubes and was thrilled as each pinecone came out even more beautiful than the last. We were going to make a few to decorate our house (I was hoping for 4 or 5) but now it looks like we will have enough for a few gifts too! If you are LuCky enough to be gifted a handmade ornament don't forget to act surprised! 


The finished products are beautiful, no matter how much glitter ends up on them! For those older LuCk followers, you can always paint the glue on with a paintbrush, use different colors etc. Another fun idea is pom poms! Leave the pine cones as is, or paint them green to look like mini Christmas trees with ormaments on them!


{Project: You've Been Elfed!}


As a lover of food, mason jars and all things crafty, I have always wanted to gift mason jar cookies to all of my friends. You know the ones:  the layers of flour, sugar and chocolate chips just waiting for a few wet ingredients to be made into baking bliss.  For whatever reason, I have never gotten around to it. Maybe it's an irrational fear of those little jars of yumminess not being as loved by someone else. 

Another thing I have always wanted to do was to "Boo!" Someone. Basically, it's like ding, dong, dash with a treat. Technically, it's a Halloween thing but who says you can't be Elfed or Snowmanned? 

As Lucas and I were whipping up another batch of play dough I realized I could do both of these fun activities and thus, LuCk Dough Jars were born!


Lucas helped pack all of the dry ingredients into mason jars, I popped on a label and attached a festive cookie cutter and we were ready to go!

For extra fun, I decided to add a film canister with peppermint extract in it. If you are using a dry scent, like cinnamon you can always use a little baggy. Just make sure you let the receiver know there is a little something extra that needs to be taken out and added before cooking!

Unfortunately, we will have to save the Boo! Portion of my great idea until next year when he understands the concept a bit more but that's okay! 

It is also a good idea to give your mom friends the heads up before coming over and leaving packages on the stoop. I also made sure each envelope said it was from Lucas.


{Make n' Mingle}


Celebrating Christmas is something relatively new to me. It's not like I had evil parents, it's just I'm Jewish, and my husband isn't. What this means is I've basically idealized Christmas for most of my life. Growing up, my family's tradition was to either go on vacation, or go to the movies. Don't misunderstand me, I'm not complaining about a lack of Christmas in my childhood.  Believe me, I had a rather remarkable childhood.  Yet, to an outsider, the whole Christmas thing is kind of magical: families bundling together around a fireplace, opening up gifts wrapped with care and love that were delivered by a jolly old man.  In my dreams, Christmas was a simply wonderful day. 

The Holiday Season is a busy time with my family: we have five birthdays, Christmas, and Hanukkah.   With so much to celebrate, it can all get a bit overwhelming! In the month of December alone, Chuck celebrates Hanukkah, Christmas, and her second birthday.   

As I grow older (and slightly more cynical), you begin to realize the commercialism associated with Christmas.  

There has always been something a wee bit wondrous about a handmade, homemade holiday. I tend to go into craft overload this time of year. Based on my Pinterest feed, I don't think I'm the only one!  I always find myself pinning all kinds of things that would be fun to make 'some day'.  Last year,  in order to combat a bit of the commercialism, I decided to make that "some day" happen. I invited a bunch of my ladies over to the house for a little Make n' Mingle.  The premise is pretty simple: you bring your craft supplies, some adult libations, and some treats.  We sit around my dining room table  craft, talk, and help each other out.  

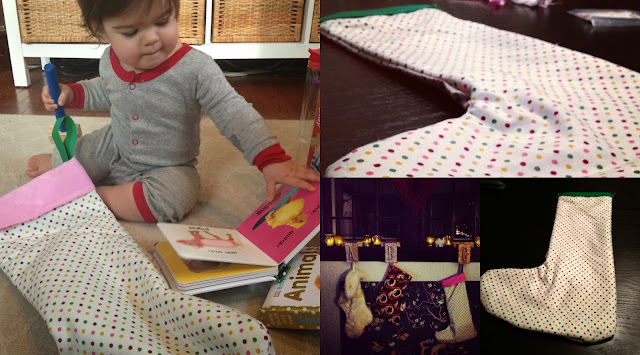
Alone, I can't sew my way out of a paper bag.  Yet, as a group, we managed to sew my daughter's Christmas Stocking last year.  I was so proud of this stocking, that I may or may not have created a Facebook post entitled  "This is how proud of I am of my stocking" and another update that states "bite me Pottery Barn Christmas, my daughter's stocking is made with love." I pulled it out of the box this year, and was amazed that it was still in one piece!  I hope she uses it for a long long time.  And, although its not as fancy as a Pottery Barn Stocking, I hope she appreciates all the thought and planning that went into it. 


This month, I would like to focus on handmade, homemade holidays.  Will my daughter receive a toy that came from a store?  Of course!  But, I would like to create something for her that came from me every year. 

The point of Make n' Mingle is not so much what we make, its how we make it.  We make it together, with friends, sitting around a table, sharing ideas, telling stories, enjoying a cocktail (or a beer if you're Karen).  It's a lot like an adult playdate! 

Want to see where we get our ideas?  Follow our Make n' Mingle Pinterest Board!  Follow Allyson Noel Make and Mingle! on Pinterest<>