{Five Days of Dough}


Around this time last year, I texted Karen an adorable toddler handprint painted to look like Santa: "We're totally doing this with the kids." I invited her over a couple of weeks before Christmas, we made a batch of salt dough, I forced my daughter's clenched fists open, and pressed her tiny fingers into the mush. 

Twelve months later, I'm standing in a sea of salt (toddler measuring and pouring is a messy task), and we're pressing little hands and feet into doughy goodness.  

What is it about dough? What makes it so magical for toddlers to explore? 

First of all, as it's name would suggest, the main point of play dough is "play". Most of the time when we hand Lucas and Chuck a ball of dough, we have nothing planned other than mushing around dough. All the motions-the smoothing, the rolling, the patting, the building- are a workout for little hands. This is an important part of developing fine motor skills. 

The textural experience of different kinds of dough also encourages sensory exploration. Chuck wasn't so sure she liked dough the first time she touched it. It took her a little while to get used to. Her little hands had to get used to the way it felt. Lucas dove right in, making foot prints with an emphatic "ta da!"
This is how we came up with LuCk's Five Days of Dough!  It's an integral part of our kid's sensory diet! 

{Day 1}

This smooth white dough is perfect for ornament making! You can roll it out and make hand prints, use cookie cutters to create shapes!  The best part about this dough is it's color.  Thanks to the 2 Cups of baking soda it is almost pure white!
1 1/2 Cups of Water
2 Cups Baking Soda
1 Cup Cornstarch
In a pot, combine all the ingredients and stir over a medium heat.  When the mixture starts to look like mashed potatoes, remove from the heat, and let it cool down. 
Bake in a 175 degree oven until hard to the touch 


{Day 2} 

This dough is a classic! You almost always have all the right ingredients in your house to make it!  It sturdy enough to last a couple of days (or weeks . . . ) in an airtight container. 
If you decide you want to preserve your child's creations, simply air dry, or bake in a 200 deg F oven until hard 
Recipe: 
In a bowl, mix the following ingredients
1 Cup Salt
1 Cup Flour
1/2 Cup Water
Stir until smooth

Day 3 
{Elf Dough} 
 (aka Peppermint Sparkle Play Dough)
This is the classic LuCk Dough mixed with some peppermint oil and glitter. 
We rolled it up in a ball, put it in a ziplock bag, and gave it to our friends at daycare!   

{Day 4}
Shapes and Sizes

Sometimes it doesn't really matter what kind of dough you use, its what you make out of it!  We like to "capture the moment" in dough with hand prints, foot prints, and any other kind of print you can think of. 
Chuck likes to build snowmen and makes her dollies cakes. Let their imaginations soar!  Dough can be anything! 

{Day 5} 
Tools Of The Trade

The kids are like Macgyver when it comes to finding things to mush into dough.  Cookie cutters, trucks, spatulas - go search around your house to find things to create interesting patterns in your dough! 

Watching the kids help us mix up the salt dough this year was a real treat!  It's a fun way to mark how far their little minds have come in these last 12 months. 


{Simple Gifts}


A couple of weeks ago I shared an article from one of my favorite blogs, on Heuristic Play. Basically, Heuristic Play is a fun way of saying "kids like to investigate the objects around them using their senses[" What amazed me was all the friends that shared their photos and comments about their babies playing with a whisk for hours.  

Since we celebrate the "Winter Trifecta" in my household (Chanukah, Christmas, Birthdays), I am frequently asked "What does Chuck want?"  First of all, Chuck has no idea what she wants.  She's two. Aside from that, she literally has fun playing with a paper bag.  This got me thinking . . . 

Since this is the season, these are some  Simple Gifts that have been Chuck approved! 

The Plastic Bottle 
This has been a long time favorite of Chuck's.  I noticed her affinity for an empty plastic bottle at a very young age.  In fact, I remember being rather humbled by the fact that she pretty much ignored all those clip on toys I bought for her car seat/stroller. All she wanted was a plastic bottle.  She wanted to nom on the top.  She wanted to squish it and make it change shapes.  She wanted to roll it on the floor. 

Now that she's a bit older, I notice that she enjoys filling the bottles with items found around the house and makes them into shakers.  Over the summer, we spent hours filling them with water and emptying them.  

Simply said: Chuck loves herself a plastic bottle

The teacher part of me loves watching how she can spend hours exploring the plastic bottle.  When she fills it with little things found around the house, she is working on her fine motor skills.  When she's rolling it around, she's working on her gross motor skills.  This is really a win/win toy for everyone! 

The Cardboard Box
One day, last winter, I cut a hole in a cardboard box[,] and made it into a tunnel for Chuck. That box survived many, many snow days last year.  For a while it was a tunnel.  When it was turned over, it was a boat.  Cardboard boxes are great for imaginative play -- because they let your child IMAGINE!  Cardboard boxes give her a blank canvas to construct whatever she wants. Watching Chuck build and construct the world around her is amazing! 

The Blankie 
Now, this one's not a freebie.  However, if you are anything like me, you were given a thousand blankets to welcome your little one into the world.  The first couple of months, you probably wrapped up your baby burrito style.  During the summer months, I would drape them over the stroller to protect Chuck from the sun.  

They are also great for fort building, peek-a-boo, hiding things . . . I can go on, and on, and on.  Building a blanket fort is one of our favorite go to activities.

While these suggestions may seem all too simple, we know them to be true. We have all seen our children, and everyone else's children, play with the box and ignore the fancy toy. Embrace your child's sense of imaginative play, and hand them everyday items that allow them to construct their own worlds. Of course, use your common sense and best judgement with regard to any item given to a child for play, and supervise when necessary. Take the caps off the bottles, make sure all the staples are out of the cardboard box. Most importantly, don't forget to jump in too, and have fun!

Also, for the record:  a lot of my house still looks like this:


{Project: Glitter Pinecones}


I have always had a creative side and have waited many years to decorate my house with homemade goodies made by tiny hands. 

 Let's face it, most kids crafts are cheesy, made with tissue paper or toilet paper rolls and although you love it because your kid made it, it's just not beautiful to look at. 

Problem: how am I going to make a simple, beautiful Christmas craft with my toddler? 

Solution: when in doubt, look to nature. Everything out there is unique and beautiful in its own right. Lucas is a big fan of exploring the great outdoors. He loves to listen to the birds, dig in the dirt and collect "treasures". One day, we were on the playground and Lucas began collecting pinecones! There are so many things to do with pinecones, but to make it toddler simple I decided to go with glue and glitter! Now this may sound like a disaster waiting to happen, but with a few of the right tools this project can be done with minimum mess. The trick is to keep everything contained. 

We contained the glue in an old frosting container and the glitter in tennis ball tubes. You can use anything as long as the top is as wide as your largest pinecone and it is recommended your glitter containers have tops. 

I was a little hesitant about doing this project with Lucas. Have you ever tried to use glitter with a toddler while taking pictures? I gave it a test run the night before, just to make sure everything was ready (and to snap a few pics incase it was glitter disaster the next day). As soon as Lucas was down the stairs the next morning he was interested what I had left on the counter. In all honesty, it went even better than I imagined! I had two containers of glitter ready to go to keep things moving along but much to my surprise Lucas loved dipping the pinecones in the glue and watching the glue drip off! He made 10 pinecones all by himself. He loved shaking the tubes and was thrilled as each pinecone came out even more beautiful than the last. We were going to make a few to decorate our house (I was hoping for 4 or 5) but now it looks like we will have enough for a few gifts too! If you are LuCky enough to be gifted a handmade ornament don't forget to act surprised! 


The finished products are beautiful, no matter how much glitter ends up on them! For those older LuCk followers, you can always paint the glue on with a paintbrush, use different colors etc. Another fun idea is pom poms! Leave the pine cones as is, or paint them green to look like mini Christmas trees with ormaments on them!


{Project: You've Been Elfed!}


As a lover of food, mason jars and all things crafty, I have always wanted to gift mason jar cookies to all of my friends. You know the ones:  the layers of flour, sugar and chocolate chips just waiting for a few wet ingredients to be made into baking bliss.  For whatever reason, I have never gotten around to it. Maybe it's an irrational fear of those little jars of yumminess not being as loved by someone else. 

Another thing I have always wanted to do was to "Boo!" Someone. Basically, it's like ding, dong, dash with a treat. Technically, it's a Halloween thing but who says you can't be Elfed or Snowmanned? 

As Lucas and I were whipping up another batch of play dough I realized I could do both of these fun activities and thus, LuCk Dough Jars were born!


Lucas helped pack all of the dry ingredients into mason jars, I popped on a label and attached a festive cookie cutter and we were ready to go!

For extra fun, I decided to add a film canister with peppermint extract in it. If you are using a dry scent, like cinnamon you can always use a little baggy. Just make sure you let the receiver know there is a little something extra that needs to be taken out and added before cooking!

Unfortunately, we will have to save the Boo! Portion of my great idea until next year when he understands the concept a bit more but that's okay! 

It is also a good idea to give your mom friends the heads up before coming over and leaving packages on the stoop. I also made sure each envelope said it was from Lucas.


{Make n' Mingle}


Celebrating Christmas is something relatively new to me. It's not like I had evil parents, it's just I'm Jewish, and my husband isn't. What this means is I've basically idealized Christmas for most of my life. Growing up, my family's tradition was to either go on vacation, or go to the movies. Don't misunderstand me, I'm not complaining about a lack of Christmas in my childhood.  Believe me, I had a rather remarkable childhood.  Yet, to an outsider, the whole Christmas thing is kind of magical: families bundling together around a fireplace, opening up gifts wrapped with care and love that were delivered by a jolly old man.  In my dreams, Christmas was a simply wonderful day. 

The Holiday Season is a busy time with my family: we have five birthdays, Christmas, and Hanukkah.   With so much to celebrate, it can all get a bit overwhelming! In the month of December alone, Chuck celebrates Hanukkah, Christmas, and her second birthday.   

As I grow older (and slightly more cynical), you begin to realize the commercialism associated with Christmas.  

There has always been something a wee bit wondrous about a handmade, homemade holiday. I tend to go into craft overload this time of year. Based on my Pinterest feed, I don't think I'm the only one!  I always find myself pinning all kinds of things that would be fun to make 'some day'.  Last year,  in order to combat a bit of the commercialism, I decided to make that "some day" happen. I invited a bunch of my ladies over to the house for a little Make n' Mingle.  The premise is pretty simple: you bring your craft supplies, some adult libations, and some treats.  We sit around my dining room table  craft, talk, and help each other out.  

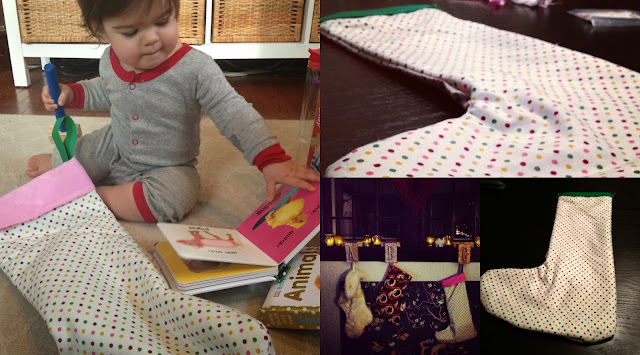
Alone, I can't sew my way out of a paper bag.  Yet, as a group, we managed to sew my daughter's Christmas Stocking last year.  I was so proud of this stocking, that I may or may not have created a Facebook post entitled  "This is how proud of I am of my stocking" and another update that states "bite me Pottery Barn Christmas, my daughter's stocking is made with love." I pulled it out of the box this year, and was amazed that it was still in one piece!  I hope she uses it for a long long time.  And, although its not as fancy as a Pottery Barn Stocking, I hope she appreciates all the thought and planning that went into it. 


This month, I would like to focus on handmade, homemade holidays.  Will my daughter receive a toy that came from a store?  Of course!  But, I would like to create something for her that came from me every year. 

The point of Make n' Mingle is not so much what we make, its how we make it.  We make it together, with friends, sitting around a table, sharing ideas, telling stories, enjoying a cocktail (or a beer if you're Karen).  It's a lot like an adult playdate! 

Want to see where we get our ideas?  Follow our Make n' Mingle Pinterest Board!  Follow Allyson Noel Make and Mingle! on Pinterest<>


{We're Thankful for Cookies}


This weekend we got together with a neighbor for the "Great Cookie Bake-a-Thon!".   There's a bunch of different ways you can tackle baking with toddlers- they key is making sure that everyone has a task, even if that task is simply holding onto a whisk.  

LuCk & Co. had a fun time in the kitchen.  Lucas honed his butter mashing skills. Abby, our guest, whisked a mean egg. Chuck just hung around the kitchen taking in the sites, and all three of them enjoyed some sampling along the way.  We measured ingredients out, counted how many eggs we cracked, and stared into the oven watching cookie magic happen! 

Baking with toddlers can be fun! Here's a few tricks of the trade to make this a little bit more enjoyable for everyone involved.

Recipe for Success
Choose a recipe that leaves a little wiggle room.  We made chocolate chip cookies.  At the end of the day, its hard to go wrong with sugar, eggs, flour, and chocolate.  There's a LOT of room for error, or as I like to call it, "experimentation."

Prep
Have everything you need in arms reach.  When I watch cooking shows, I am always in awe at the level of preparation that goes into getting everything set up.  I try to emulate this when kids aren't around.  It's an absolute MUST when the kids are in the kitchen.

Get Everyone Ready
Once their hands are washed, most recipes can be divided into "wet" and "dry" ingredients.  If you have multiple bakers in the kitchen, you can assign some one to be "in charge" of each of these things.  Lucas went to town creaming the sugar and butter!  He is a mashing machine!  

Don't Forget the Fun 
Have some containers filled with ingredients for the kids to to play with. There's a lot of waiting in baking; having bowls filled with a little bit of flour to play with while you are waiting for a batch of cookies to come out of the oven, reduces the risk of real ingredients getting sampled.  

The cookies are baked and all packaged up to bring to the Senior Center on Wednesday! They may not win any competition, but I sure hope the folks we deliver them to can taste all the love that went into these (and don't notice that a few chocolate chips may or may not be missing) 
I wouldn't be telling the whole story without the disclaimer that this will be messy and the end result will vary.  There may even be some crying involved.  Chuck reminded me that baking is a very sensory rich environment: there's a lot of clanking and whirling and buzzing. Baking with a group is chaotic; and although a full-blown toddler sensory overload meltdown was not in this recipe, I'm pretty sure that's what happened. 

Sometimes I need an activity like this to remind me that even though I had visions of mommy/daughter bake-a-thons this winter, I may need to re-envision my vision.  Chuck is super sensitive to sounds right now (hey, she's 23 months old, what do you expect?), so the noise of the mixer really bothered her.  She's also been super clingy lately, and its really hard to measure out flour while balancing a toddler on your hip. Even though I wanted her to get her hands in on the action, Chuck was perfectly content watching from the sidelines (or in my arms) and chewing on a whisk.  I need to remind myself that "that's OK".  And it is.  There will be more chances to bake cookies in this girl's future.     


{Surviving Thanksgiving Part III: Teaching Toddlers To Be Thankful}


With a little over a week until Thanksgiving, we have been thinking a lot this month about all the things we have to be thankful for. I've spent a lot of time focusing on what to cook, and how to keep my kid at the Thanksgiving table for 30 minutes.  The reason I put this much planning and thought into these things is so when next Thursday arrives, we can spend time actually giving Thanks.

Lucas and Chuck give us so many things to be thankful for, observing them experience new things
, listening to them giggle, and watching them share secrets with each other.

It got me thinking, "how can I get my kid to be thankful? Is that even possible?"

I don't think there's a single person in the world who sets off on the adventure of parenthood with the goal of raising a self-centered child.  Twenty-two months into it, I have to honestly admit, I can see how some kids become self-centered.  I'll give you the play-by-play: the first months of my daughter's life, I gave her what ever she asked for.  My main goal was to decrease the amount of crying that came out of her.  If buying her a golden pony encrusted with diamonds would have made that happen, I would have done it.  About a year ago I had "a moment". Chuck was doing something wrong at the dinner table, I looked at her firmly and said "no".  I didn't raise my voice.  I didn't look upset, but she knew that I wasn't pleased at that moment. The above photo is the result of this interaction.  I snapped it right before things took a turn for the worse. Her little lip came out, her eyes welled with tears, and I felt horrible.  What ever it was that she did that was so wrong (I honestly can't  even remember it at this moment) was it so bad to make my baby girl turn into a melty mess?   It was this moment I realized that I was no longer just some lady taking care of a baby; I was a parent.  I was overwhelmed with guilt: did I over react?  I'm not a giant believer in tough love.  At that precise moment, all my heart wanted to do was scoop my daughter up in my arms, tell her I was sorry, and explain that everything would be OK.  I realized though, that I couldn't do this.  I had to stand my ground.  I had to let her cry.  It was the longest 30 seconds of my life.


I am a complete word dork. I am especially fascinated by words that are both nouns and verbs. The moment that I realized I was a parent, was made infinitely more sublime by realizing I was, myself, both a noun and a verb.
Parent (n): One who begets, gives birth to, or nurtures and raises a child; a father or mother.
Parent (v) bring up.

So, how do you (the parent) teach your child to be thankful? How do bring up your kid to be thankful?  This is still a work in progress in my household, and probably will be for the next several decades; however, this is the plan I am going to try.  It follows the age old philosophy of "Monkey See.  Monkey Do."

Model Being Thankful (Monkey See)
Chuck's first words were rather normal, "mama," "dada," and "baba". It was her next words that made me proud: "day dew."  That's Chuck for "thank you".  She still says it; sometimes at inappropriate times that it makes it almost comical.  I choose to believe that she picked this up from all the times I would say "thank you" when someone did something for me (picked up a toy, brought dinner to the table).  It makes me realize that if you want your child to be thankful, you have to model this behavior yourself.   I hope her little "day dew" blossoms into a thousand heartfelt thanks within her lifetime. I hope she one day realizes exactly what she is saying and why she is saying it.  Right now, however, we have to start some where.

Do Thankful Things (Monkey Do)
Next week Lucas and Chuck are going to get together with some friends and deliver cookies to our local senior center.  Is this going to save the world? No, but hopefully we'll bring a little joy to people who may not be able to celebrate Thanksgiving with their families, or maybe to someone who's just having a blah kinda day.  Will Lucas and Chuck know why their moms lugged them to the senior center?  Probably not, but if I waited until Chuck understood things, well, then I'd be one bored mama.  What I really hope is that this is something that becomes a LuCk tradition, and in 10 years Lucas and Chuck will say, "hey, Mom, you know how you've lugged us to the senior center for the last 10 years?  Well, I've been thinking about it, and why can't we go to the senior center every Thursday?" 'Cause, hopefully this will bring a smile to everyone's face.*


I'd love to take credit for all these ideas, but being a mother in the 21st Century, I Googled "how to teach my kid to be thankful".
Here's the most helpful resources I found:
Teaching Children to be Grateful 
5 Ways to Raise a Grateful Child 
How to Raise Grateful Kids


*also, because I couldn't leave you with a pic of my miserable daughter, without a few smiles to balance it out. 

{Project: Seeds!}

When I was a little girl, I would wander away from my mother at the market.  She never had to work that hard to find me; she knew exactly where I would be.  There was an aisle at the market that had large barrels filled with dried goods: rice, beans, and grains.  I was always elbows deep in the rice barrell.  I loved everything about the way it felt; it was smooth and cooling.  I dreamed of filling a pool with rice and going for a swim . . . . . Many (many) years later, I am happy to say that I frequently dream of floating through a sea of rice.  The seed was planted in the aisle of that Market, and it stuck!

With the weather turning a cooler, we've been hunkering down a little bit more.  Fall is that in-between season when you pack up the water toys, but it's not quite time to bring out the snow gear.  This year, as I was packing up the kiddie pool, I got this gut feeling that Chuck was not quite ready to say goodbye to her beloved summer water playthings, and that got my mind working overtime.  Basically, it ended up with this phone call:
Husband: What are you doing tonight?
Wife: I'm going to the gym and to the hardware store.
Husband: What do you need at the hardware store?
Wife: Birdseed.
Husband: We have birdseed leftover from last winter.
Wife: I need more.
Husband: How much more.
Wife: About a kiddie pool's worth

To answer your question, "yes, my husband thought I was insane." I've seen seeing a bunch of sensory tubs on Pinterest and floating around the blogosphere, so I was feeling a little inspired.  Karen and I thought long and hard over what to fill the pool with.  At first we thought of feed corn, but after many many phone calls, we couldn't seem to locate a small enough batch.  I reminisced about swimming through rice, but it was just too wasteful. Then Karen mentioned bird seed, and it just clicked!

So, we did what any normal moms would do, we spent our Friday night at the gym and the hardware store feeling our way through the aisle of birdseed.  In case you're wondering, it takes about 40 pounds of birdseed to fill your average 12 gallon swimming pool.

Sunday morning, the sun was shining, the leaves were blowing, the air was crisp, and Chuck and I anxiously waited for Lucas and our buddies to arrive.  We dragged all 40lbs of seed down to the back yard, pulled the string on the bag, and dumped it right into the small blue pool.  Karen & I had made all kinds of educational guesses as to what would happen next.  They ranged from "this will last 10 minutes", to "they are going to have SO MUCH FUN".  We were slightly skeptical of where this playdate would land on the "fun-o-meter"


I am pleased to announce that all four kids dove right in!  The filled up buckets over and over and over again.  Drove trucks through the seeds.  Explored the seeds with their hands.  We had kids from eighteen months to over three years old happily occupied with a pool full of birdseed for a good 45 minutes. That is about an eternity in mom-years.  They were so occupied that the three of us moms looked at each other and wondered "why didn't we arrange for some sort of adult playdate?"   Or, at the very least "why didn't I make a pot of coffee for my adult guests"

I can sit here and list the five million reasons why filling a pool with birdseed is great for the kids (it helps with their cognitive development, social skills, physical skills, communication skills,  …. I really could keep going), but sometimes its fun to sit back, and watch your kid actively learn and experience something new!  Chuck was truly in her element! She loves filling containers, so this activity was perfect.  Lucas loves digging with his trucks, and the seeds provided a happy alternate to the dirt and sand that he is familiar with. 


Karen & I did make our best educated guess on what to fill the pool with.  Here's a helpful check list you may want to take to the hardware store with you when the mood hits! Have fun and happy exploring! 
  • What does the material feel like?
  • What does the material smell like?
  • What does the material look like?
  • What does the material sound like?
  • Would you mind if your kid ate it?
  • Does your kid have any tactile preferences? (For example: Chuck HATES sticky things, so filling the pool with whipped cream may have to wait a while)


And, don't worry . . . we are working on about a thousand ways to re-use 40lbs of birdseed!

{Surviving Thanksgiving Part II: Play with your Food}


There is a certain element of nostalgia that enters my house when the holidays roll around.  Whether its baking pies, pureeing pumpkin, roasting vegetables,or mashing sweet potatoes, sentimentality permeates everything I do in the kitchen. I am acutely aware that with each and every scent that fills my home, I am creating memories for my family.

Holiday food evokes a certain comfiness  in my brain.  So many of my childhood memories are so strongly associated with food, that a simple whiff of gravy (albeit from a jar) makes me feel like a kid again. Comfort foods define this time of year.  Not only do they fill your tummy, but they embrace you like your favorite childhood blanket.

The thing about Thanksgiving foods is there are so many that are naturally appealing to toddlers (and puree nicely for those without teeth.)  I'm not going to tell you what to cook, because I think planning your family's holiday meals is a personal decision.  The very fact that I demand the Stouffer's Stove Top Stuffing of my childhood over whatever gourmet version my mother makes this year, proves this point (very embarassingly).  I am, however, going to tell you the story of my apple pie. 

Nothing quite reminds me of Thanksgiving as much as apple pie.

In eighth  grade I took a Home Economics class at school.  By "Home Economics", I really mean we learned how to scramble eggs and make a pie.  That year, for Thanksgiving, I told my mother that I was going to bake pies.  My mother is fantastic cook, however, baking is not her passion.  Regardless, I decided we were going to have a homemade desert for Thanksgiving.  I made everything from scratch. I purchased a pastry cutter to make the pie crust; I peeled bags of apples; I intricately decorated the crust exactly as my teacher had. I wish we had iPhones and Instagram back then, because that pie was beautiful.  My family ate the pie, and I was happy.  In future years, I upped the ante and made multiple pies.  In the interest of time, I decided to buy the Pillsbury dough frozen.  No one noticed that my love and effort weren't in the dough, my family ate the pie, and I was happy.  As the years went by, Thanksgiving desert became "my thing".  Every year my father still tells me that he can pick up a pumpkin cheesecake from Costco, and I try to explain the love and effort that goes into my pies.

Last  year, with my 11 month old daughter in tow, that love and effort hit a major snag. I put Chuck on the floor of the kitchen, gave her some kitchen things to play with, and started rolling out my dough. I quickly realized that baking a pie was not going to be easy to do one-handed with my attention divided.  As I was trying to get my beautiful homemade, handmade pie into the oven, I tripped over one of the measuring cups that she was playing with on the floor, dropping the pie, and breaking the pie plate. Shocked, I sat on the floor temporarily defeated. Then, I did what any new-mom would do: I pulled myself together and I faked it.  I pulled a Pillsbury dough out of the freezer, filled it with pre-made apple-pie-filling, decorated it with my piecrust cutters, and showed up at Grandma's house.  I didn't lie, or pretend that I baked it from scratch, and no one really seemed to care.  My family still ate the pie, and I was happy. 


This year, to keep myself Martha-organized, I have developed a little survival plan of my own. It is my hopes that these tips will help me prepare my meal with as little frustration as possible.  

With that said, I now pass on my second thanksgiving survival tip: be prepared and plan some fun in your menu! Play with your food!  You may be able to host a Thanksgiving feast of blog worthy proportions, however, right now, you are just trying to survive Thanksgiving with a couple of fun stories to share with your Grandchildren.

Enlist the help of a tiny kitchen assistant (and some adult ones)

On the cusp of two years old, Chuck is definitely joining me in the kitchen this year!  I hope to enlist her unique skill set to help me crumble up crackers for the stuffing.  Given the right task, toddlers can make great kitchen helpers.  They can assist in giving veggies and fruit a "pre-rinse".  Toddlers also find cleaning up a lot of fun!  Chuck is great at picking teeny tiny things off the floor, and wiping surfaces clean (her innerMartha would be proud).

This year, when an amazing friend asked what she could bring to Thanksgiving Dinner, I happily texted back "desert."  Though I still love to make pie magic happen every Thanksgiving, I always welcome help. I hope that one year, Chuck will take up an interest in pie baking, and the pie-making torch can be passed on.

Plan for accidents 

Knowing I have a back-up plan makes me slightly less anxious about things going wrong.  When I am purchasing the ingredients to make Thanksgiving magic, I always buy a few extra.  I figure the worst-case-scenario is that I wind up with frozen pie crust in my freezer, and the possibility of a fake-n-bake pie in my future. As my pie was hitting the floor that Thanksgiving Eve, I was concocting a back-up plan.  I knew I had extras of all the ingredients used in my now splattered pie, so i had all it would take to fake-n-bake another pie. What, me panic? I think not!

Play with your food
For Thanksgiving, my "innerMartha" says that you should play with your food. There is nothing formal about hosting toddlers at the Thanksgiving table (and I'm pretty sure Martha would be OK with that). I had a great time making a "fruit turkey" with my niece last year!  There are so many fun food creations to make for or with your kid!


Follow our Pinterest Board if you need a little inspiration!


Remember, you are feeding your family and friends around the same table, and that is what matters most.


{Project: Play-Dough}


It was 6:45 on Saturday morning when I heard the pitter patter of little feet coming down the hall. I dared not open my eyes in hopes that those small feet would climb into bed with me to cuddle and buy me few more minutes of sleep (or, maybe bring me a coffee) but really who was I kidding? It's one thing to be awake at 6:45, it's another to hear these dreadful words come out of Lucas’s mouth: “Lucas make cookies?” 

What?! Are you kidding me?!

Honestly, I love being in the kitchen with my child, but not at 6:45am on Saturday. Lucas was relentless. Lucky for him, his mama can whip up a mean batch of play-dough, even before that first cup of coffee kicks in. 

Play-dough is one of those timelessly classic concoctions that allows for endless learning possibilities. Almost everyone knows the smell (or taste) when you pop open a nice fresh can of Play-doh. With that in mind, I decided to make this batch of play-dough extra special and seasonal by adding pumpkin spice to it. It was a fun twist on regular dough and the first of many scented doughs to come. Our sense of smell helps form memories. By making scented play-dough, I am hoping to provide Lucas with special memories for years to come!  

Of course, since Lucas is a toddler, play-dough also called for a fun experiment with taste! Lucky for Lucas, homemade playdough is 100% edible so explore away!  The funny thing is, he tasted each ingredient as it was added but had no interest in eating it once it was all mixed together or cooked. 

Another great thing about play-dough is it is fun all by itself. No need for fancy play-dough tools. While we were making it I was thinking of all of the kitchen gadgets we could use with it. We ended up using two potato mashers and two plastic spiders left over from Halloween.

Amazingly, this project kept Lucas occupied for over an hour! He doesn’t even play with his beloved trains or trucks for that long of a stint! Play-dough is open ended so the possibilities are endless. Follow your child's lead and make anything he can imagine! We made everything from hot dogs to birthday candles to a basketball hoop. 


Extra LuCk
Check your spice cabinet for new and exciting scents. You can also use liquids like vanilla extract or even coffee! If you are feeling extra adventurous, you can add glitter too!

Want our secret recipe? We like to share!  Click here to download the guide!